photo Home-01_zps4183128e.jpg              photo AboutJess-02_zps9efae9a4.jpg              photo Email-03_zpsfe60254d.jpg              photo Sponsor-04_zpsad5f9cd7.jpg
Showing posts with label Shabby Chic. Show all posts

Tuesday, October 15, 2013

Consignment Stores-- My Inspiration of the Week

Consignment stores.

What do you think when I say that? 

This week, I think iNSPIRATION! 

I went home to visit the family this weekend and we ended up stopping in St. George, Utah at the most adorable shop I have every seen. Have any of you shopped at Urban Renewal?? It is the most unique store. I fell in love. And when I say love, I mean like drooling, can't get it off my mind after I leave, twitter-patted, real love. Whew! Glad I told someone about that. 

The only thing I am disappointed with is myself. Why do I forget to take pictures of things I love? I could never tell you. But I did catch a few pictures of my FAVORITE pieces that I will share with you today. 


This dresser above is like my dream piece of furniture. This iPhone photo doesn't even give it justice. I want you to go to this store and just see this piece. You won't regret it. It appears to be a wicker piece that was painted and sanded or used the Vaseline technique. I just love it. 
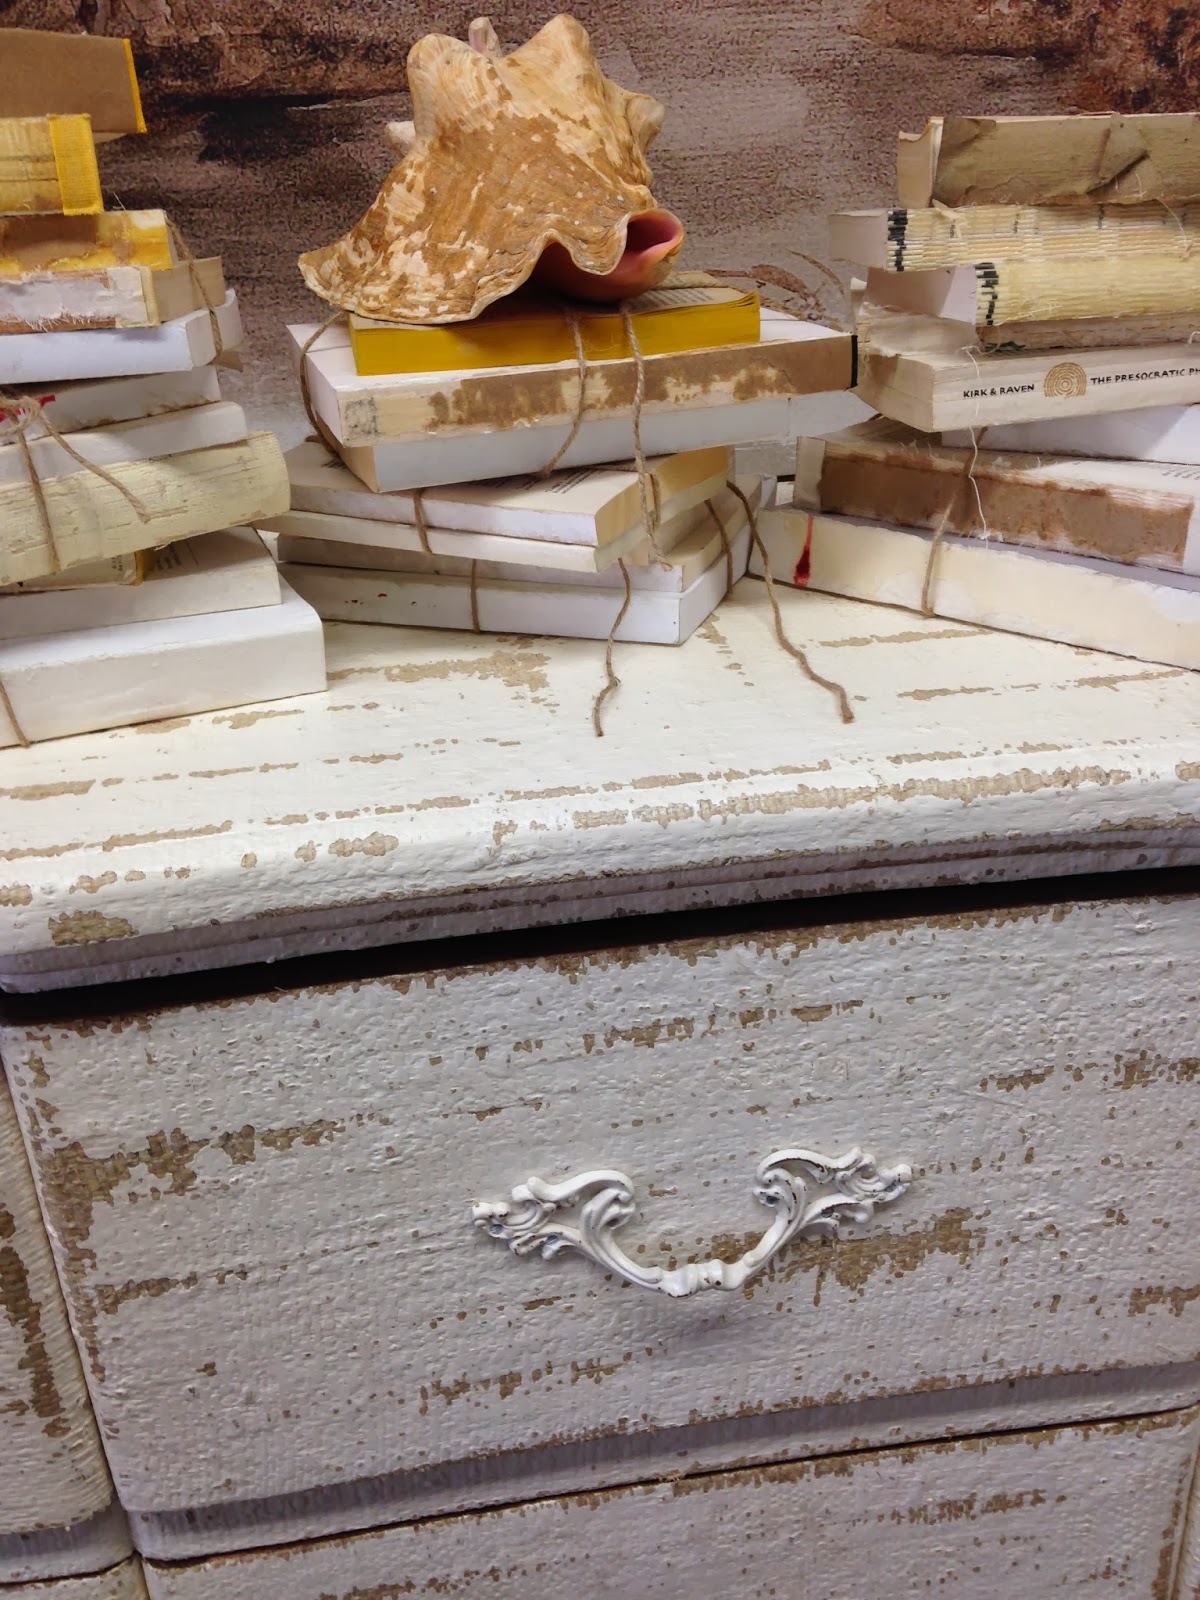

Also those awesome pieces of artwork on top are perfect. The stacks are books with the covers pulled off. This gives a muted and nude look to the stacks as well as very worn and vintage. The store tied jute around the stacks to give them that cohesive feel and look. Also, sea shell, duh. That's awesome.


This next piece was hard to take a picture of since the store is literally head to toe furniture and decor. There are tables stacked on tables stacked on chairs. It sounds like madness, but it is pure bliss. 


This table is my inspiration for a FREE table I am scoring from my parents. They actually bought a super amAAzing table from this store, and had this smaller table they need to get rid of. I love the two tone look of black on white. I also love the glossy top. 

What do you think? Should I go another direction with my table? 

Do you shop consign and design stores? I would love to know. 


Tuesday, October 8, 2013

Free Inspiration Printable

Hello lovelies! I have great news today! After numerous interviews and applications, I finally have a job! I have been going to grad school online, blogging, and learning how to be married, but I have wanted a job to help make friends in Las Vegas and to save up for a house so Cliff and I can one day have a family! Cliff can totally support our family without my help, but I want to get out there and constantly be doing what I can to help as well.

I have had a hard time finding my job since I am still in school. I felt overqualified for some jobs and I didn't have enough experience for others. Honestly, job hunting is one of the worst things! I don't wish it upon anyone. It is easy to get discouraged, especially after getting turned down time after time and all that stares you in the face when you get home is a giant job application to fill out.

I received a call today at around noon letting me know I got a job!

During the LDS General Conference this weekend (if you aren't sure what it is, check out this site http://www.lds.org/), I was inspired especially by a poem President Thomas S. Monson quoted in his talk. I thought I would create a printable to put in a frame on my desk to look at every day. I then thought, why not share it with my awesome followers?? So here you go...


This is like my new motto of my life. I know I have faced some hardships in my life, but I know I would not be the woman I am today without a few trials. To know happiness, I have to know sadness. 

Download it, print it, and put it somewhere special! If you watched GC did you have any favorite quotes?? I am thinking of making some more printables. I would love to make a custom printable for any of you!

Follow on Bloglovin

Monday, September 30, 2013

How to Add Character Pieces to your Home

Anybody think I fell off the map? I sure did. Last week I had a mini vacation visiting my family and friends in Utah! No blogging, just eating lots of food, chatting, watching movies, going to Soda Run and trying a Dr. Evil (it's only the greatest thing to hit my mouth... Coconut and Dr. Pepper. YUM!).

After getting back to the big city of Las Vegas I was bombarded by the husband spoiling me with a date night to seafood and comedian John Caparulo on Friday night and Nascar Trucks on Saturday! It was a blast. You may have already seen my updates on instagram. If you're not a follower, you should be http://instagram.com/jay_zeeee. You can check out my awesome redneckedness (it's a real word, don't worry about it).

Anyways, last night my husband took me out to a dry lake bed just outside of Vegas with the intention of taking pictures of somethings for my blog. He's the sweetest.

So without further ado, I would like to introduce you to my beautiful typewriter...


Isn't she a beaut?? We found this diamond at a garage sale in Cliff's hometown. As soon as a I saw it I fell in love. For me, this typewriter is a representation of who I am. It's unique, antique, tells a story, and is super cute. 

My suggestions for you when adding character pieces to your home are the following:

1. Add pieces to your home that make you happy. It doesn't matter if it was on the latest magazine cover. You are the one who lives in your home so make sure it makes you happy.

2. Don't pass up a bargain. At first my husband didn't think we needed another item to fill our tiny one bedroom apartment, but I stood my ground knowing finding a typewriter in this fun color again may be difficult. 

3. You don't need to find everything overnight. Decorating a home should take time. Don't run out and buy everything you see. Find the small pieces that make an impact on your home. 

4. Thrift shopping can be a good thing. Thank you Macklemore for making Thrift Shopping famous. I am a total hipster since I thrift shopped before it was cool ;)

You can find a diamond in the rough. You just need vision sometimes to alter a picture frame or sculpture to how you want it.

5. Start small. If you aren't sure what you like, use website such as pinterest or magazines to gain inspiration to what catches your eye and pleases your inner designer. Trust me, you will know after you pin 30 yellow tables that you really like yellow tables. 

Do you have any tips for adding unique character pieces to your home? I would love to hear it!


Follow on Bloglovin

Thursday, September 19, 2013

DIY Wedding Centerpiece

Since my last wedding inspired post was so popular, I decided to make it a regular post on the blog. Today I am sharing pictures of my centerpieces I had at my wedding reception.

TA DA! Look how pretty they turned out!


A lot of help from my family and friends went into making these possible. I had 3 elements in my centerpieces. The first was a large mason jar filled with lemons and babies breath. We simply bought a large order of babies breath and went crazy with it. We also bought a ton of lemons to make these beautiful and natural centerpieces at my outdoor reception.

The second item on the agenda was ANOTHER smaller mason jar modge podged with lace my mom found on a super sale in our local fabric store.


The third were these awesome candle holders my dad made! He was such a trooper throughout the whole wedding process. I printed off pinterest pictures and basically told him to make it! He went up in the mountains, found some fallen tree branches, and made these sweet candles holders. 

All together the centerpieces were very affordable and the perfect style for my country vintage shabby chic wedding!

If you like this style and want more wedding ideas check out my pretty DIY background here!

Also if you haven't entered to win these adorable pillows make sure to enter here!

Now go win yourself some pillows! Ta Ta!


Follow on Bloglovin

Wednesday, September 11, 2013

DIY Topiary Crafternoon Project


My apartment seemed lacking some life. Since we can't have pets and I can't keep a plant alive, I turned to the next best thing... a Topiary!

This project was EASY! Anyone could make this super cute craft and it was very cheap.

The supplies you will need are:
  • 2 different size moss balls (I bought mine at Hobby Lobby)
  • 1 Dowel (You choose what size fits best with your moss balls)
  • Jute String
  • Container to hold topiary
  • Extra moss for the container
  • Foam
  • Hot Glue Gun
I started by putting the dowel through the center of the two topiary balls. I eyeballed what looked good for the spacing. I then glued and wrapped the jute around the dowel to give it a more natural look. 


I just bought a cheap flower pot and painted it the color I wanted to coordinate with the room. I already had the mustard yellow (or Mac and Cheese yellow) craft paint and used a foam brush to apply.


I bought the foam at the same time as the pot and found the same circumference to fit perfectly into the pot to hold the dowel up. I measured to find the middle and made a hole. 


I then hot glued the extra moss I bought to the foam. This is super fun but soo messy!


I then placed it in the pot and touched up the edges where the foam was still showing. 


 All you need to do now is put the dowel in the pot! Easy project! 


My husband even loves the color and life it brings to our apartment! Let me know what you think! If you like this project you may want to check out our dresser revamped into an entertainment center here.

-Jess

Oh and one more thing. I've been contemplating a give away... How would you like to win cute items for your home?? 

Friday, September 6, 2013

DIY Wedding Backdrop


Oh hey, I'm alive. I just took a little break from blogging since life is hectic. I have been sick, grad school just began, and Cliff just had surgery (you can read about it on my other blog). I haven't had time to be super crafty woman and thrifter of the week, but I have a ton of fun wedding projects I haven't shared yet. I am so excited to talk about this super easy wedding backdrop. The truth is I wasn't the person who made this. I helped a little, but I owe this project to my lovely mom and friend Jen. They helped make tons of my wedding decorations while I was still in grad school.


So as you can see this backdrop is shabby chic and perfect to create with your own styles and colors. I used a few different types of lace I found on clearance at a local fabric store, burlap, and a mint green fabric. And when I say I, I mean my mom and Jen haha. It was simply the task of cutting the strips to the desired length and tying them to some rope (keeping with the rustic shabby chic look). I actually named the style/theme of my wedding as "country vintage shabby chic" and yes my husband memorized it. He was such a trooper. 
Just my mini session with Harmony before the reception.

I borrowed old doors from my parents in law and boom we had the perfect backdrop to stand in front of during the line. It also held the perfect place to do the cake cutting at our outdoor reception.


Overall it wasn't too expensive to make, and it turned out perfect for my wedding theme! Thanks Mommy and Jen for the perfect DIY!

Related Posts Plugin for WordPress, Blogger...